Usage of pyJSON
The first start
After installation, when starting pyJSON for the first time, it will deploy its config files, basic directory structures, the example schema and will then ask whetever it shall create log files or not. If you intend on reporting bugs, you might want to turn log file creation on. (A log will always be produced, but only written to the harddrive, when turning this option on.)
UI elements
pyJSON features a graphical user interface in order to make table-like editing of JSON possible.
Note
pyJSON is in development and the interface might be subject to change.
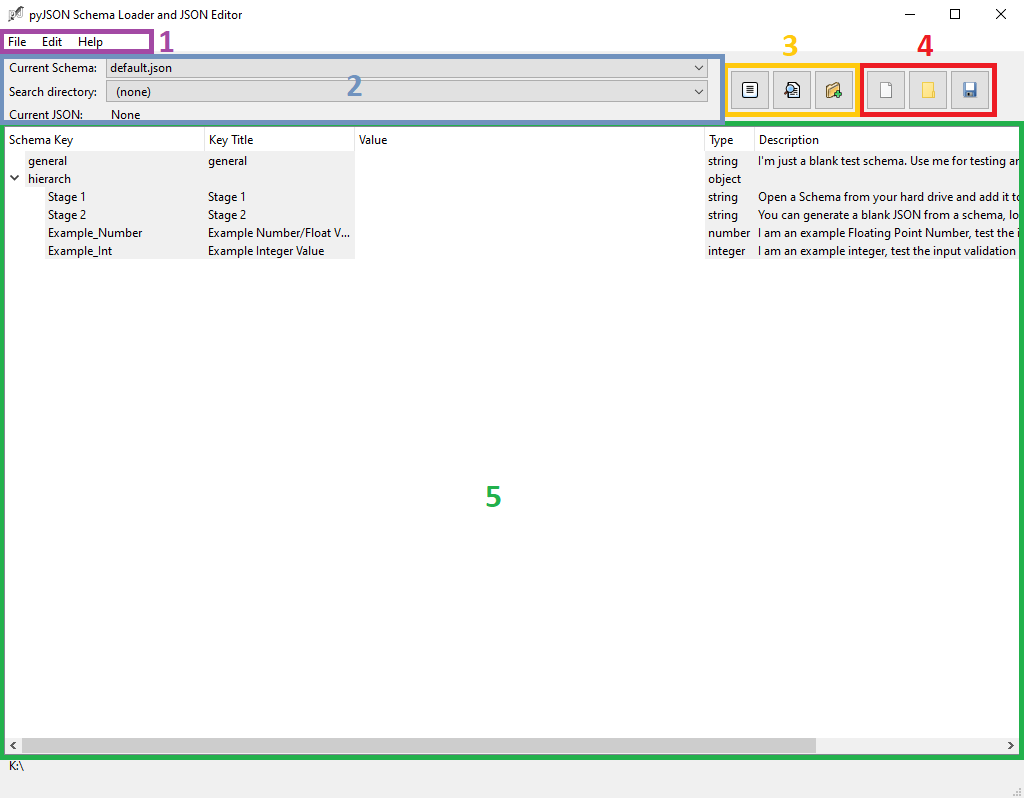
The menu bar contains more advanced functions, such as storing and retrieving default templates for the current schema, reloading the current file and dropping changes or, in later stages, additional preferences.
The schema and directory selector lets the user choose the current schema or select one of the indexed directories for search. It also displays the last JSON document opened or created.
The first group of buttons contains buttons for adding a copy of a schema to the tools own storage, using the currently selected schema and entered information for a search in the currently selected indexed directory and adding a new directory for indexing.
The second group of buttons contains buttons for creating a blank JSON based on the current schema, open a JSON and save the currently entered information as a JSON document.
The editing widget is presenting the JSON document and its corresponding schema in a tabular fashion. It consists of five columns.
The Schema Key column shows the nested structure as it is stored in the JSON (and the schema, if the JSON was created by pyJSON)
The Title shows a proper title. Note it will show either “KeyError” or “Type Error” if the Schema does not fit the JSON document properly.
The Value column is the only editable column by default. Enter values here. Input gets validated, when entered and will be rejected, if violating restrictions implied by the schema. The input form adapts to certain keywords.
The Type indicates, what type of data has to be entered.
The Description contains the content of the description stored in the schema.
Notes and comments on behaviour
Warning
Saving a before opened then edited document will overwrite the original without further question!
Note
Currently, value fields for objects are editable, however, any information being entered there gets omitted, when saving the JSON document.
Tutorials
Creating a JSON on a schema basis
A core functionality of the pyJSON Schema Loader and Editor is the creation of a JSON document based on a corresponding JSON Schema, validating inputs and structure in the process. In order to do so, one needs a JSON schema.
If pyJSON is not installed yet, please refer to the installation pat of this document. We create a JSON based on the integrated demo schema that gets deployed when first starting pyJSON.
Start pyJSON.
If not the case, select the “default.json” in the “Current Schema” drop down menu. Then, if needed, use the “New from Schema” Button (see image above, segment 4, indicated by a blank paper)
Enter some information. You can leave entries blank, however keep in mind that your JSON might not validate against the schema, if the field must not be empty.
Click on the “Save” button (see above, segment 4, indicated by a floppy disk). A dialog will appear in which you can select the location the file shall be saved in. A name,
_meta.json, will be proposed. Navigate to a directory of your choice, change the name, if you want to and save the file.You can check the file with an editor of your choice.
Adding a schema to the internal tool storage
pyJSON can store several schemas for selection as a base for the next JSON document to be created. We assume we know already, which JSON schema we want to add. In this example, this will be the Plasma Metadata Schema (Plasma-MDS), a general purpose schema for creating and validating metadata associated with the field of plasma physics.
Navigate to https://github.com/plasma-mds/plasma-metadata-schema - the repository of the Plasma-MDS.
Select
json-schema, thenplasma-mds.json.Select
Raw, then save the document on your computer. Make sure it is saved as a JSON file.Start pyJSON.
Press the “Add Schema” button (see above, segment 3, indicated by three horizontal bars).
In the appearing dialog window, navigate to the downloaded JSON document and “Open” it.
The schema gets copied and afterwards, it can be selected from the drop down menu.
Indexing a directory for search
pyJSON makes it possible to index and search directories for JSON documents. This is helpful, when data has to be managed locally. In order to follow this section, create a directory beforehand, add a few more JSON documents and keep in mind, which schema you used.
When finished with preparation, open pyJSON.
Click the “Add directory” button (see above, segment 3, indicated by a folder and a plus sign).
Select your directory. Wait for the program to report finishing the process.
Utilising the search
With a directory added for indexing, we can now use that index to have a look for our JSON documents.
Select a JSON Schema.
Select an index.
(Optional) Use the editing interface as a search mask - empty fields will be omitted
Click on the “Search” button. (see above, segment 3, indicated by a magnifying glass)
The search results will be presented in a separate window. It is possible to right click them to either open them in pyJSON, in an editing software or in the file manager.
Hint
It might occour that, with only a schema selected and no search terms set, more results are presented than expected. This
is not necessarily an error, since JSON Schema gets only applied to keywords present in the JSON document, therefor also
validating JSON documents not having exactly the desired structure. To circumvent that behaviour, the required keyword
must be present in the schema and list all keys that must be present. See
this guide by the JSON schema team
for details on how validation works.
Using the command-line interface
While pyJSON works perfectly fine as a standalone tool, advanced users might prefer to include it into their automation pipelines utilising tools like AutoHotKey or LUA scripts. For these cases, pyJSON sports a command-line interface in order to control several aspects of the tool, such as which schema is to be used to open a JSON with, using a different working directory for separated configurations, to name a few.
pyJSON supports the following command-line arguments:
argument |
parameter |
explanation |
|---|---|---|
|
a directory path |
pyJSON will set the last used directory to the provided path and index it. |
|
a full path to a JSON file |
Instead of using the last JSON opened, pyJSON will attempt to open the provided file. |
|
the file name of a stored schema |
Bypassing the config, pyJSON will attempt to load with this schema selected. |
|
a directory to be used |
pyJSON will use the provided directory for its config and data instead of the repo directory |
Understanding logs and their function
pyJSON outputs a plethora of messages to the console (if being run within one), mostly for debugging and testing purposes. Relevant messages are also shown in message boxes, however, when reporting bugs or including new features, in order to provide additional information for replication, a log file can be very helpful.
Hint
When started for the first time, you will be asked, whetever pyJSON should write logs to the drive it is located on. You can also change this setting via “Edit” -> “Preferences…”.
The log files are stored in the Logs directory located in the working directory of pyJSON. They are labeled with the date and time
of execution of pyJSON and are written in plain text. Generally, you will find distinct notes in the log file - differenciating between
informational entries, warnings, errors and critical errors. Also, a header will be present in every log, containing information about the
operating system, the Python version and other crucial information for replication purposes.